FastAPI and Celery
Walkthrough a minimal example utilizing FastAPI and Celery.
In this post, I will present to you a simple, minimal working example of utilizing new, high-performance Python web framework FastAPI and Celery - Distributed Task Queue for executing long-running jobs.
In addition to the FastAPI framework and Celery distributed task queue, we will also use the RabbitMQ as a messaging queue platform and Redis for returning the results of the executed jobs. For the monitoring of Celery jobs, the [Flower] - Celery monitoring tool will be used. All of the mentioned components will be orchestrated together with Docker and docker-compose.
If you don’t have already installed Docker and docker-compose, you can check on how to install it in out one of my previous blog posts. Also, it is assumed that you have a working version of Python 3.6 (at least) already installed on your machine.
The complete source code for this example is available on GitHub, feel free to check it out.
Before we dive into details on how to implement the usage of Celery task with FastAPI framework, we have to make sure, that we have installed on necessary dependencies. My preferred way of managing the Python application dependencies is with the pipenv tool. The following snippet contains the commands to install all needed dependencies.
# if you are using pipenv tools execute the following:
pipenv install fastapi uvicorn celery pydantic redis

# else if you are using the pip execute the following:
pip install fastapi uvicorn celery pydantic redis
Firstly, let’s create a simple server application using FastAPI framework. The code snippet below presents really basic FastAPI application with one controller function listening on the root (/) mapping, which receives one dynamic path parameter, in our case word parameter of type string.
Following the new task is created with before mentioned word parameter, which is then added to a background task for the purpose of retrieving the response messages of a submitted task.
from fastapi import FastAPI, BackgroundTasks

from worker.celery_app import celery_app

app = FastAPI()


def celery_on_message(body):
    print(body)

def background_on_message(task):
    print(task.get(on_message=celery_on_message, propagate=False))


@app.get("/{word}")
async def root(word: str, background_task: BackgroundTasks):
    task = celery_app.send_task(
        "worker.celery_worker.test_celery", args=[word])
    print(task)
    background_task.add_task(background_on_message, task)
    return {"message": "Word received"}
Next, we have to implement the Celery worker which will execute given tasks. Lets first create a new folder named worker with two python files: celery_app.py and celery_worker.py.
In celerey_app.py we have to instantiate the celery app with backend and broker paths and configure it as presented in a code snippet.
from celery import Celery

celery_app = Celery(
    "worker",
    backend="redis://:password123@localhost:6379/0",
    broker="amqp://user:bitnami@localhost:5672//"
)

celery_app.conf.task_routes = {
    "worker.celery_worker.test_celery": "test-queue"}
celery_app.conf.update(task_track_started=True)
The final thing to implement is the celery_worker.py. The celery_worker.py should contain a task annotated function which defines what should be done. In the snippet below is an implementation of such function. To explain, our function receives the world parameter, then goes into for loop which loops for 10 times, each time executing the sleep function and updates the task state. Finally, when execution is finished it returns a dummy string.
from time import sleep

from celery import current_task

from .celery_app import celery_app


@celery_app.task(acks_late=True)
def test_celery(word: str) -> str:
    for i in range(1, 11):
        sleep(1)
        current_task.update_state(state='PROGRESS',
                                  meta={'process_percent': i*10})
    return f"test task return {word}"
We are now done with the implementation part. To run this example we have to have also running the needed RabbitMQ and Redis servers, and for monitoring the execution of Celery tasks the Flower is needed. For this part, we will leverage the docker-compose tool and just define, in docker-compose.yml, how different components should be connected together. In this guide, I won’t go in much detail on docker-compose.yml definition, for now, all you need to know is that the configuration of RabbitMQ, Redis and Flower is defined in it.
Be aware: this is only meant for development and most definitely not for production.
version: "2"

services:
  rabbitmq:
    image: "bitnami/rabbitmq:3.7"
    ports:
      - "4369:4369"
      - "5672:5672"
      - "25672:25672"
      - "15672:15672"
    volumes:
      - "rabbitmq_data:/bitnami"

  redis:
    image: "bitnami/redis:5.0.4"
    environment:
      - REDIS_PASSWORD=password123
    ports:
      - "6379:6379"
    volumes:
      - "redis_data:/bitnami/redis/data"

  celery-flower:
    image: gregsi/latest-celery-flower-docker:latest
    environment:
      - AMQP_USERNAME=user
      - AMQP_PASSWORD=bitnami
      - AMQP_ADMIN_USERNAME=user
      - AMQP_ADMIN_PASSWORD=bitnami
      - AMQP_HOST=rabbitmq
      - AMQP_PORT=5672
      - AMQP_ADMIN_HOST=rabbitmq
      - AMQP_ADMIN_PORT=15672
      - FLOWER_BASIC_AUTH=user:test
    ports:
      - "5555:5555"
volumes:
  rabbitmq_data:
    driver: local
  redis_data:
    driver: local
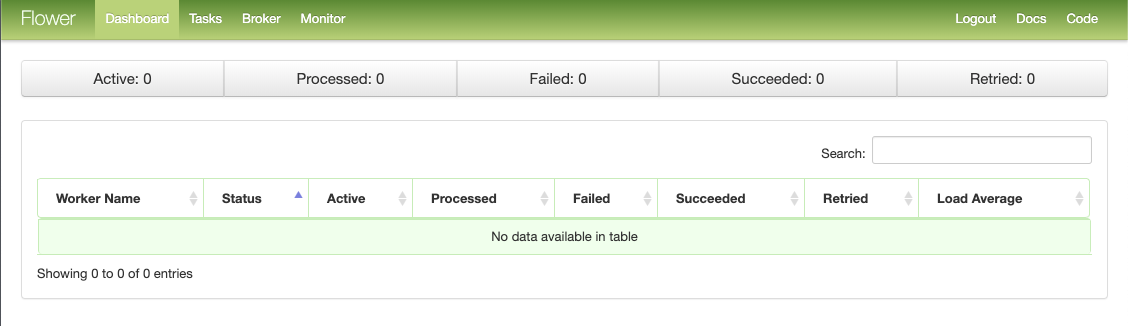
To start up the RabbitMQ, Redis and Flower instances run the docker-compose up command in the terminal. To check if RabbitMQ is running navigate to the localhost:15672 and you should be greeted with RabbitMQ login page. As well as for the Flower monitoring tool navigate to the localhost:5555 where the basic authentication popup should be displayed. If you enter the user for username and test for the password you should see similar as is presented in the figure below.
Next, we have to run our FastAPI application and our Celery worker. This can be done by executing the following commands:
# if you are using pipenv run the following:
pipenv run uvicorn main:app --reload
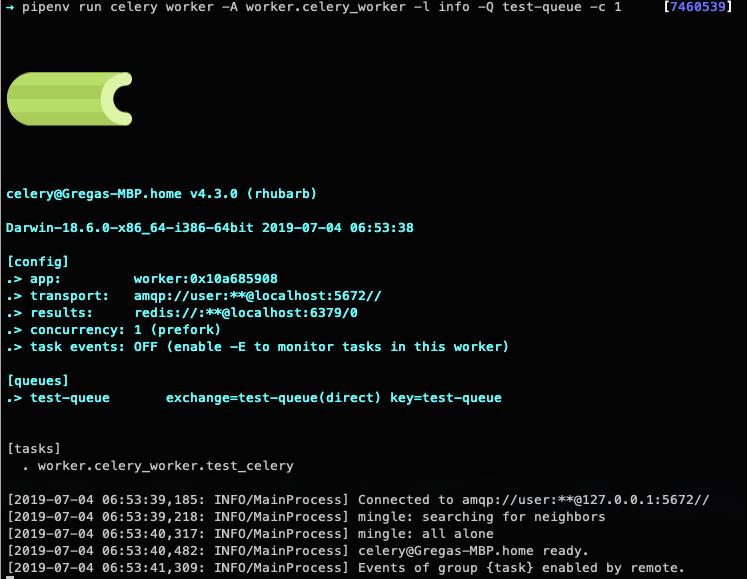
pipenv run celery worker -A worker.celery_worker -l info -Q test-queue -c 1
# otherwise run
uvicorn main:app --reload
celery worker -A worker.celery_worker -l info -Q test-queue -c 1
When running the command for starting the FastApi application, a similar output is expected.

And when the command for starting the Celery worker is executed, such output as presented in screenshot bellow is expected.
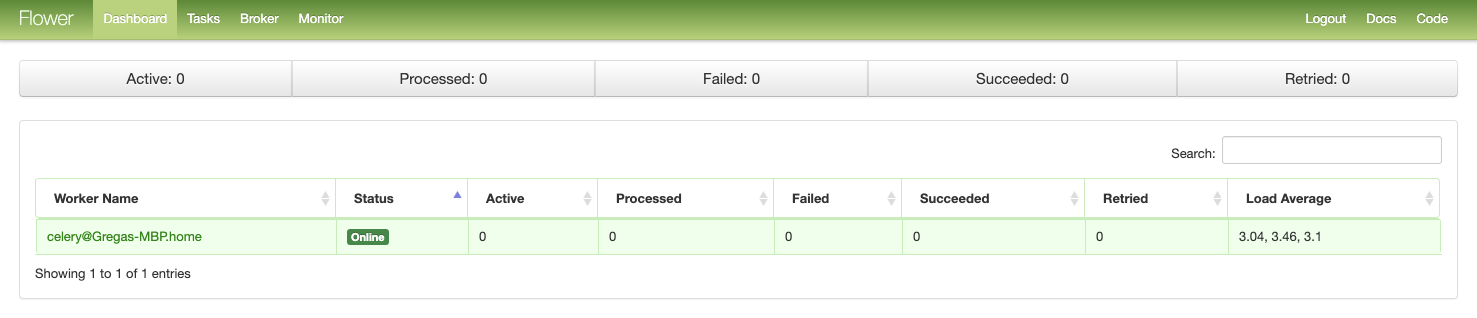
If you navigate back to the Flower monitoring tools, you should see that the Celery worker is detected and listed in the table of workers.
The last thing, to test if everything works as is expected, let’s navigate to our FastAPI Swagger UI at localhost:80000/docs and trigger the GET request via the UI.
If we navigate back to the Flower monitoring tool and open the Tasks tab, we should see one new task entry with all the details about it as presented in the figure below.

That is it! We have now fully working setup of FastAPI application working with Celery and Flower tool for monitoring the Celery tasks. If you have any issues regarding the running or implementing the presented example, do not hesitate to comment or contact me.
Grega Vrbančič
Assistant Professor
Grega Vrbančič is an Assistant Professor at the University of Maribor, Faculty of Electrical Engineering and Computer Science.